Front-end
I decided to build this Single Page Application, with vanilla JavaScript ES5 & ES6 syntax, with a custom self-contained STATE. A STATE is like a memory place-holder for when you need to store data that you want to reuse. It also keeps track of login sessions. Most importantly is to keep track of the app state and to build a data connection between the different screens. The Single Page App was compiled using WebPack and Babel. This is done to make the application smaller and compatible with most browsers. It also contained other libraries for error checking and debugging and to make sure the code is 100% working. The reason why I chose this approach and with all my new projects, is to keep the app self-contained and self-sufficient so that it's not platform depended. Meaning that if the customer later decides to switch the back-end out for another platform that it can be done without rebuilding the whole app. The customer would also be able to use the app on another website and still be able to use the existing back-end.
I mention JavaScript as the platform of choice for this project, but has since switch over to REACT(it is JavaScript with super charger!), using the M.E.R.N stack for furture projects.
Theme Framework
The front-end was build using Bootstrap as the theme framework for the app. The instructions, from the client at the time, was to keep the design as simple as possible, wireframe-like. Since Bootstrap makes use of flexbox it makes it a very good proven responsive framework that would cater to all devices.
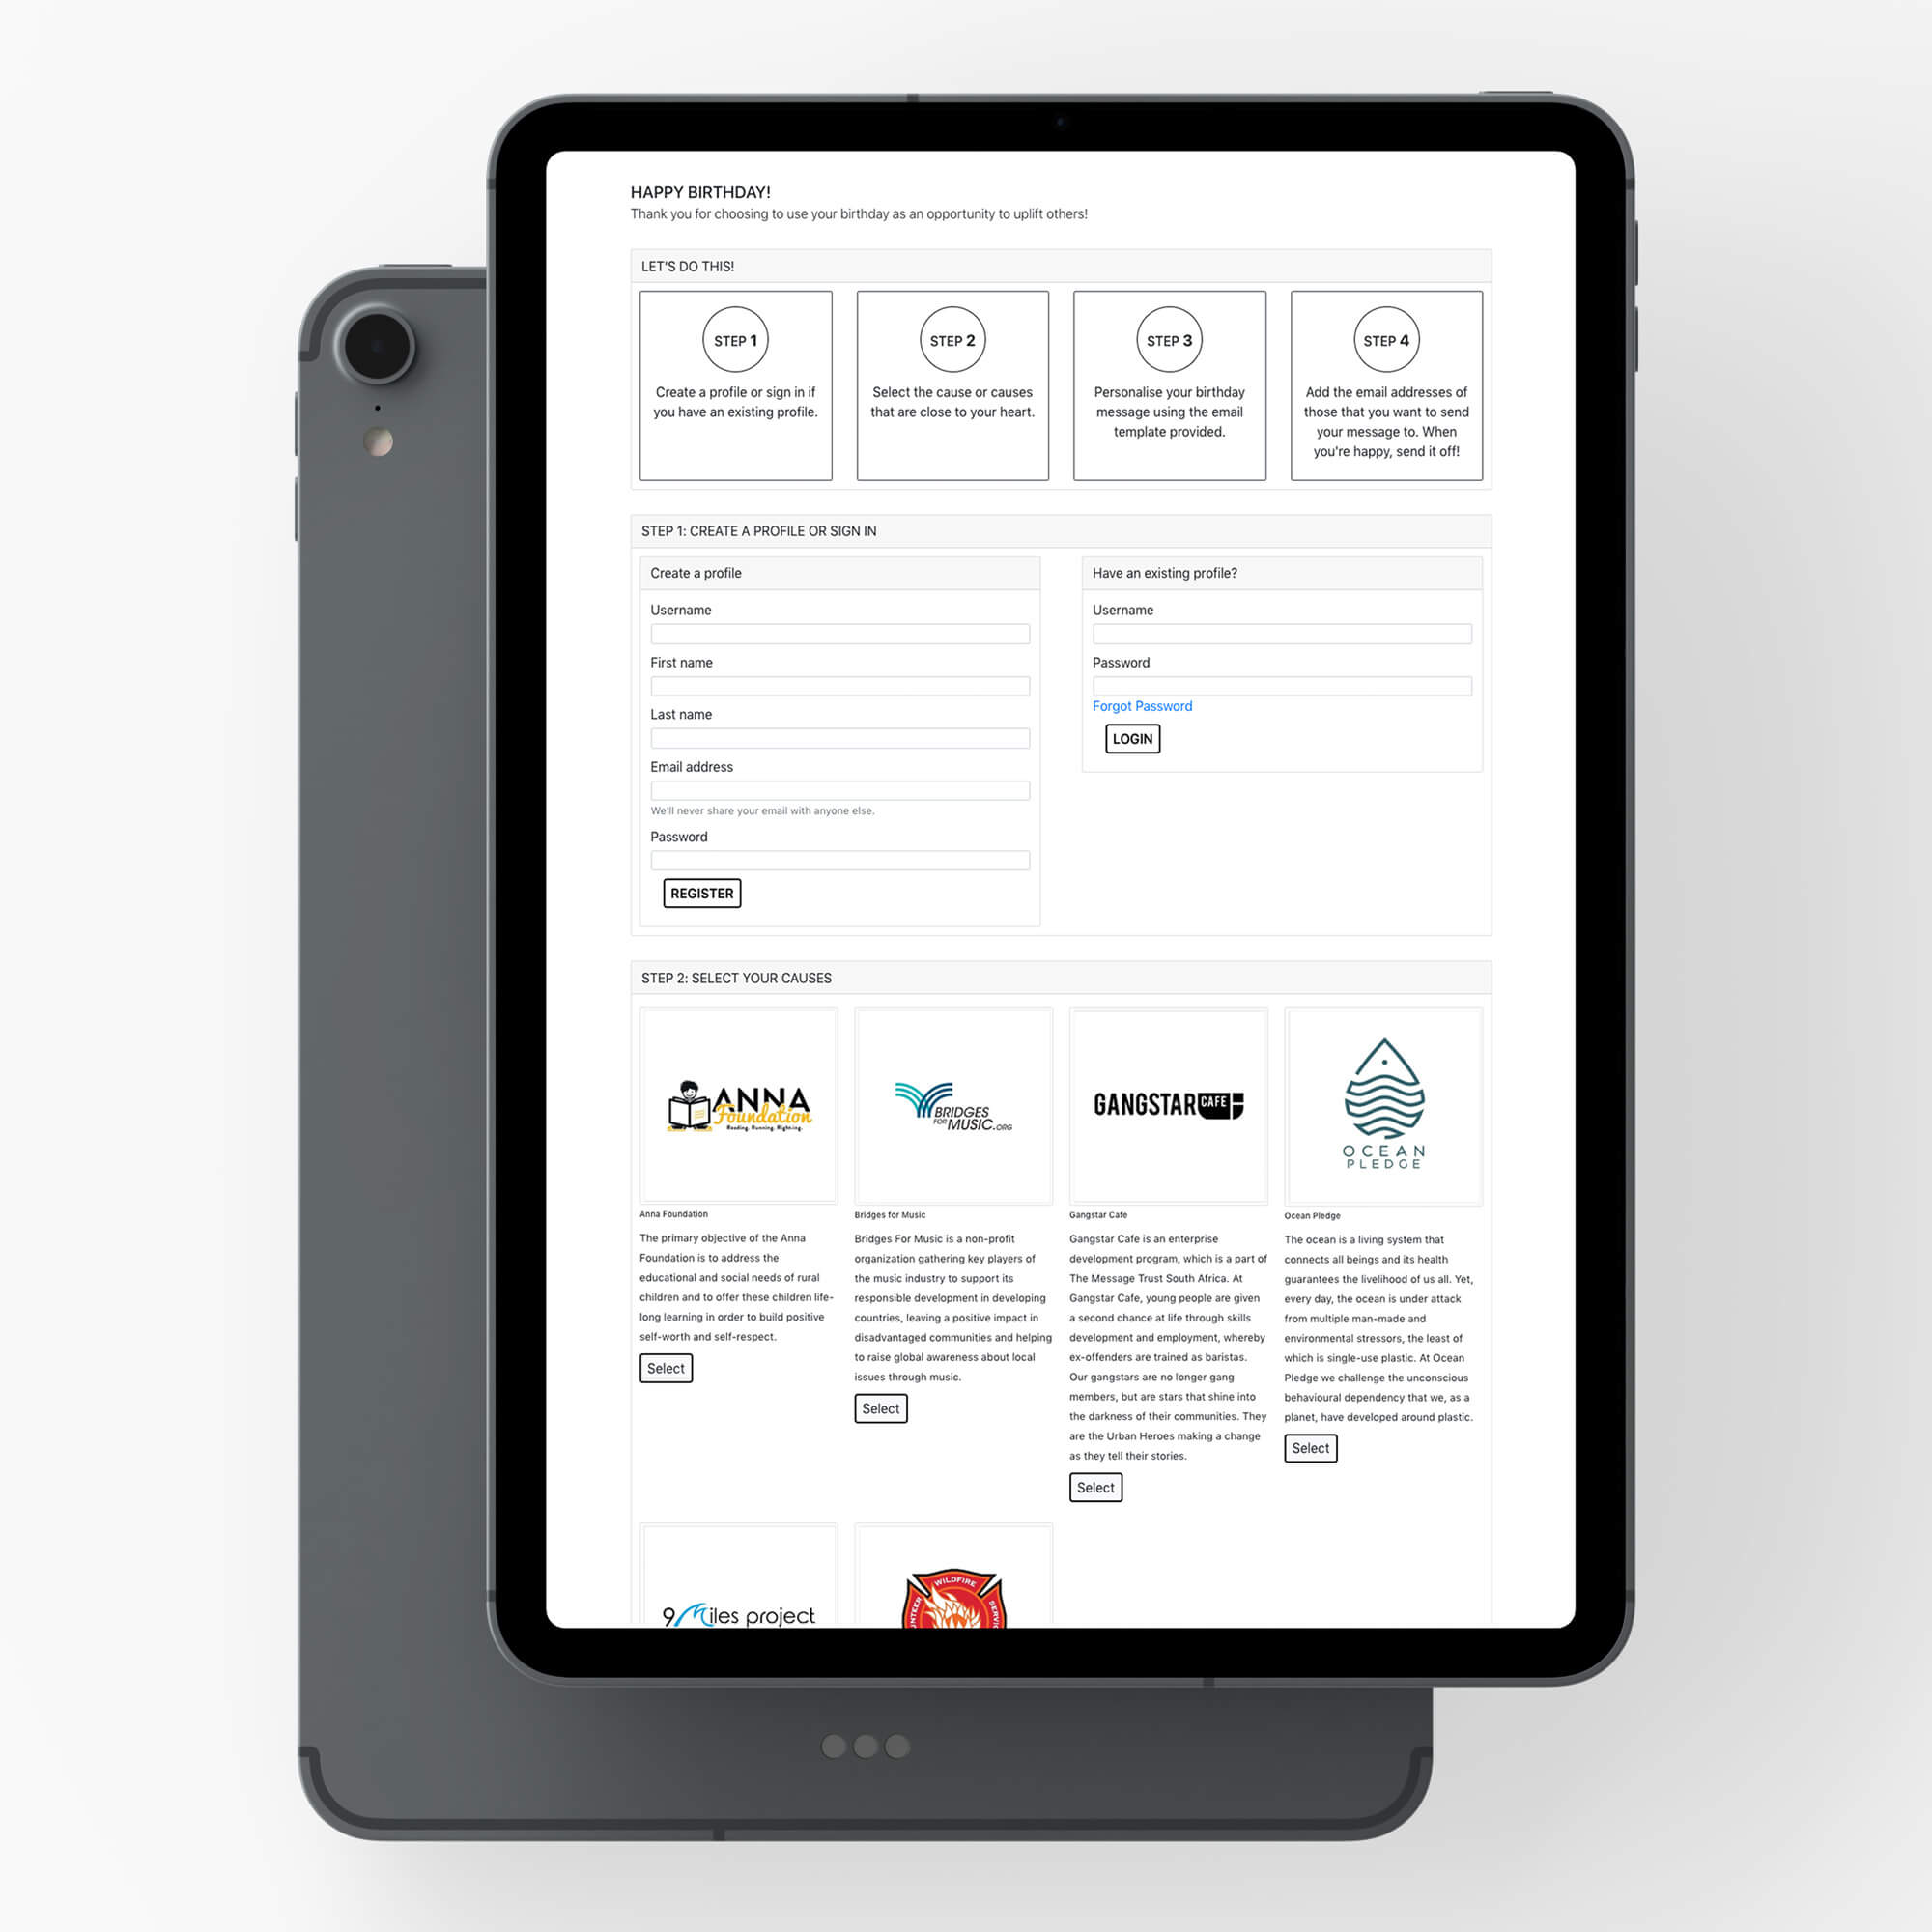
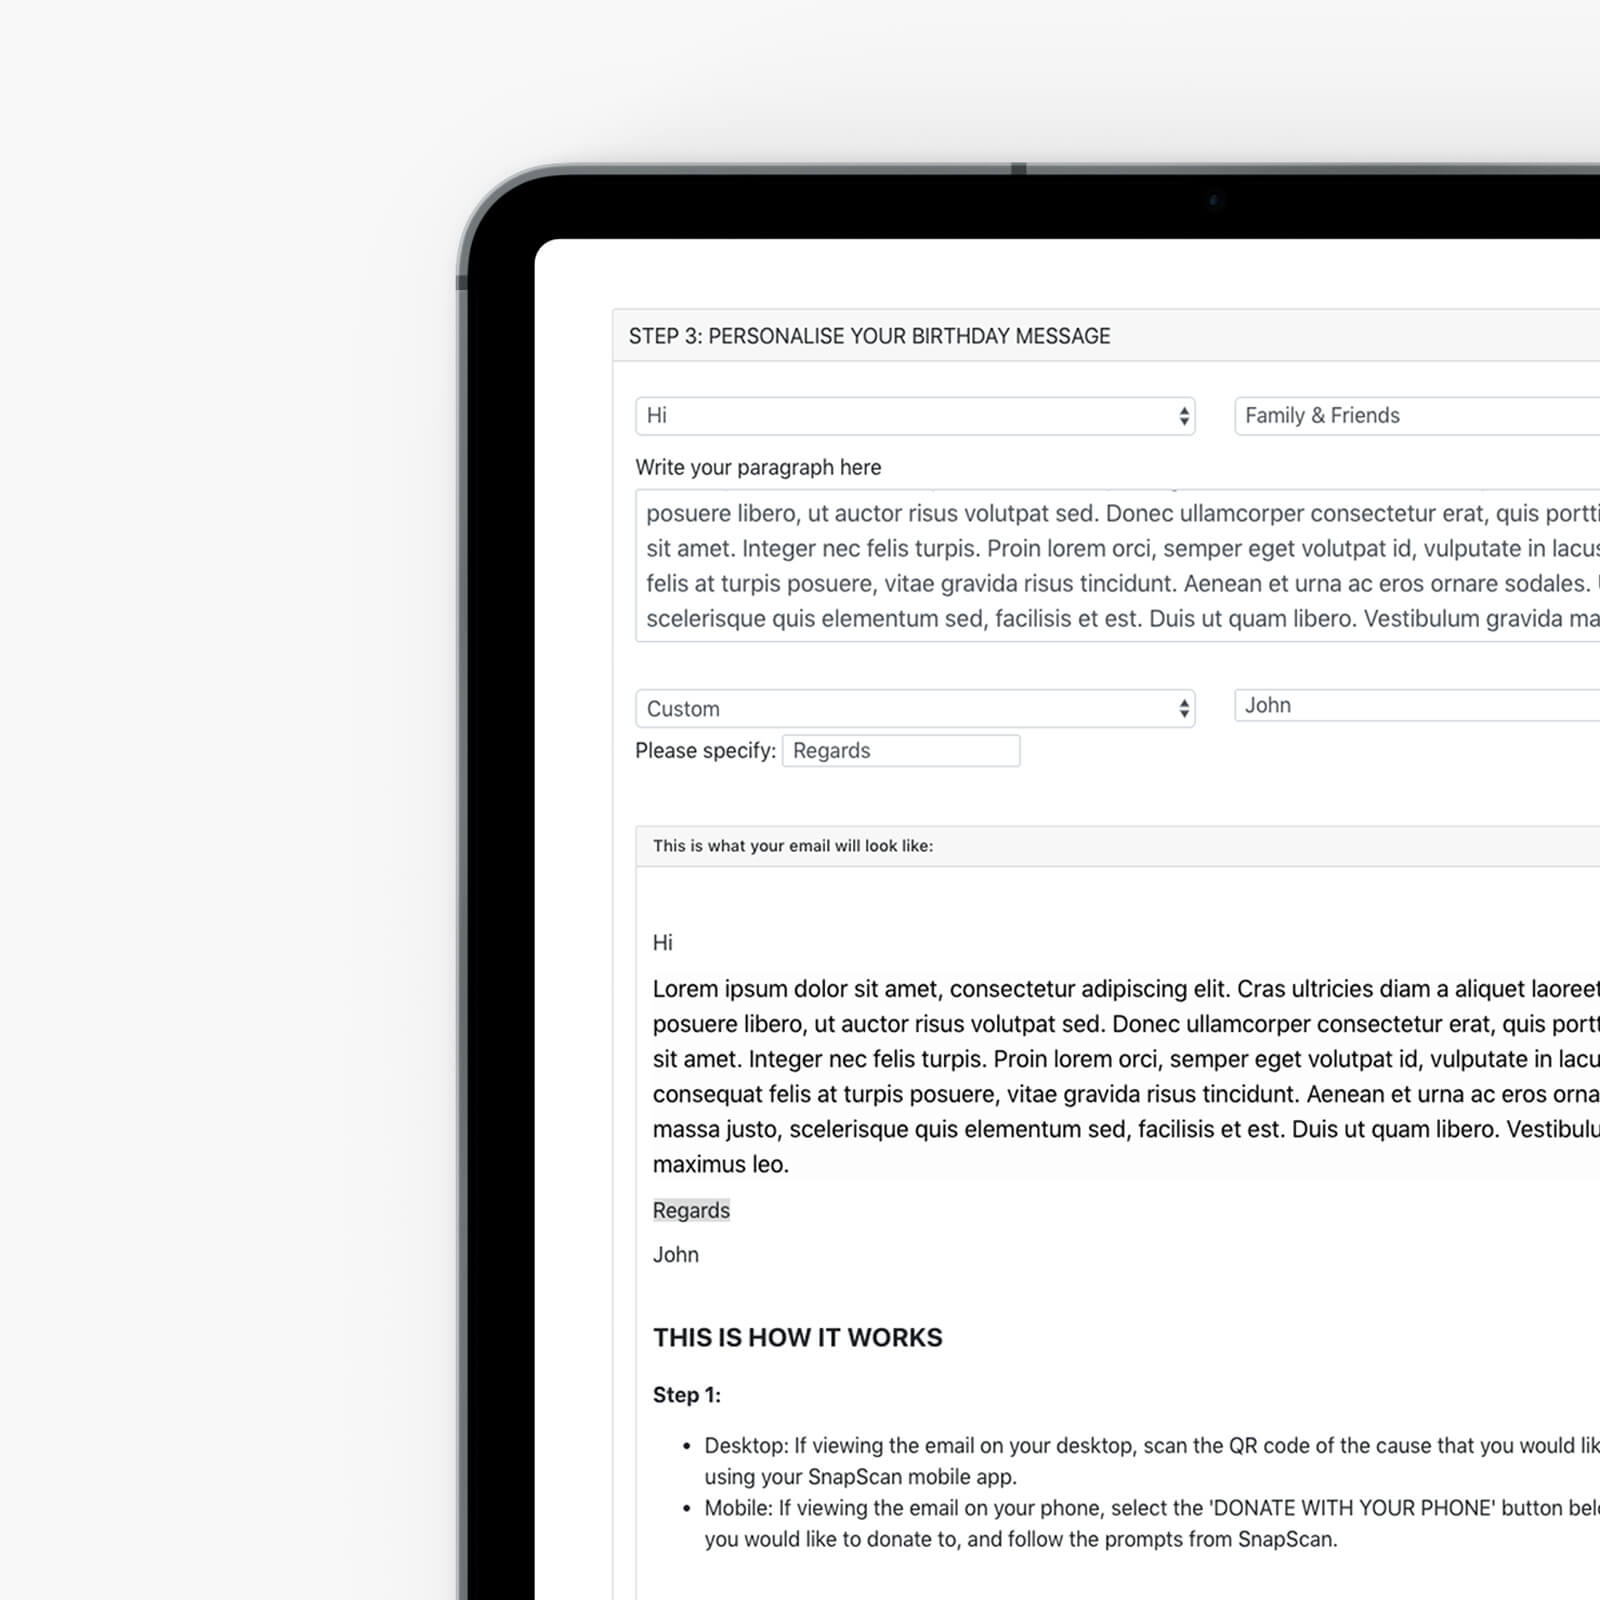
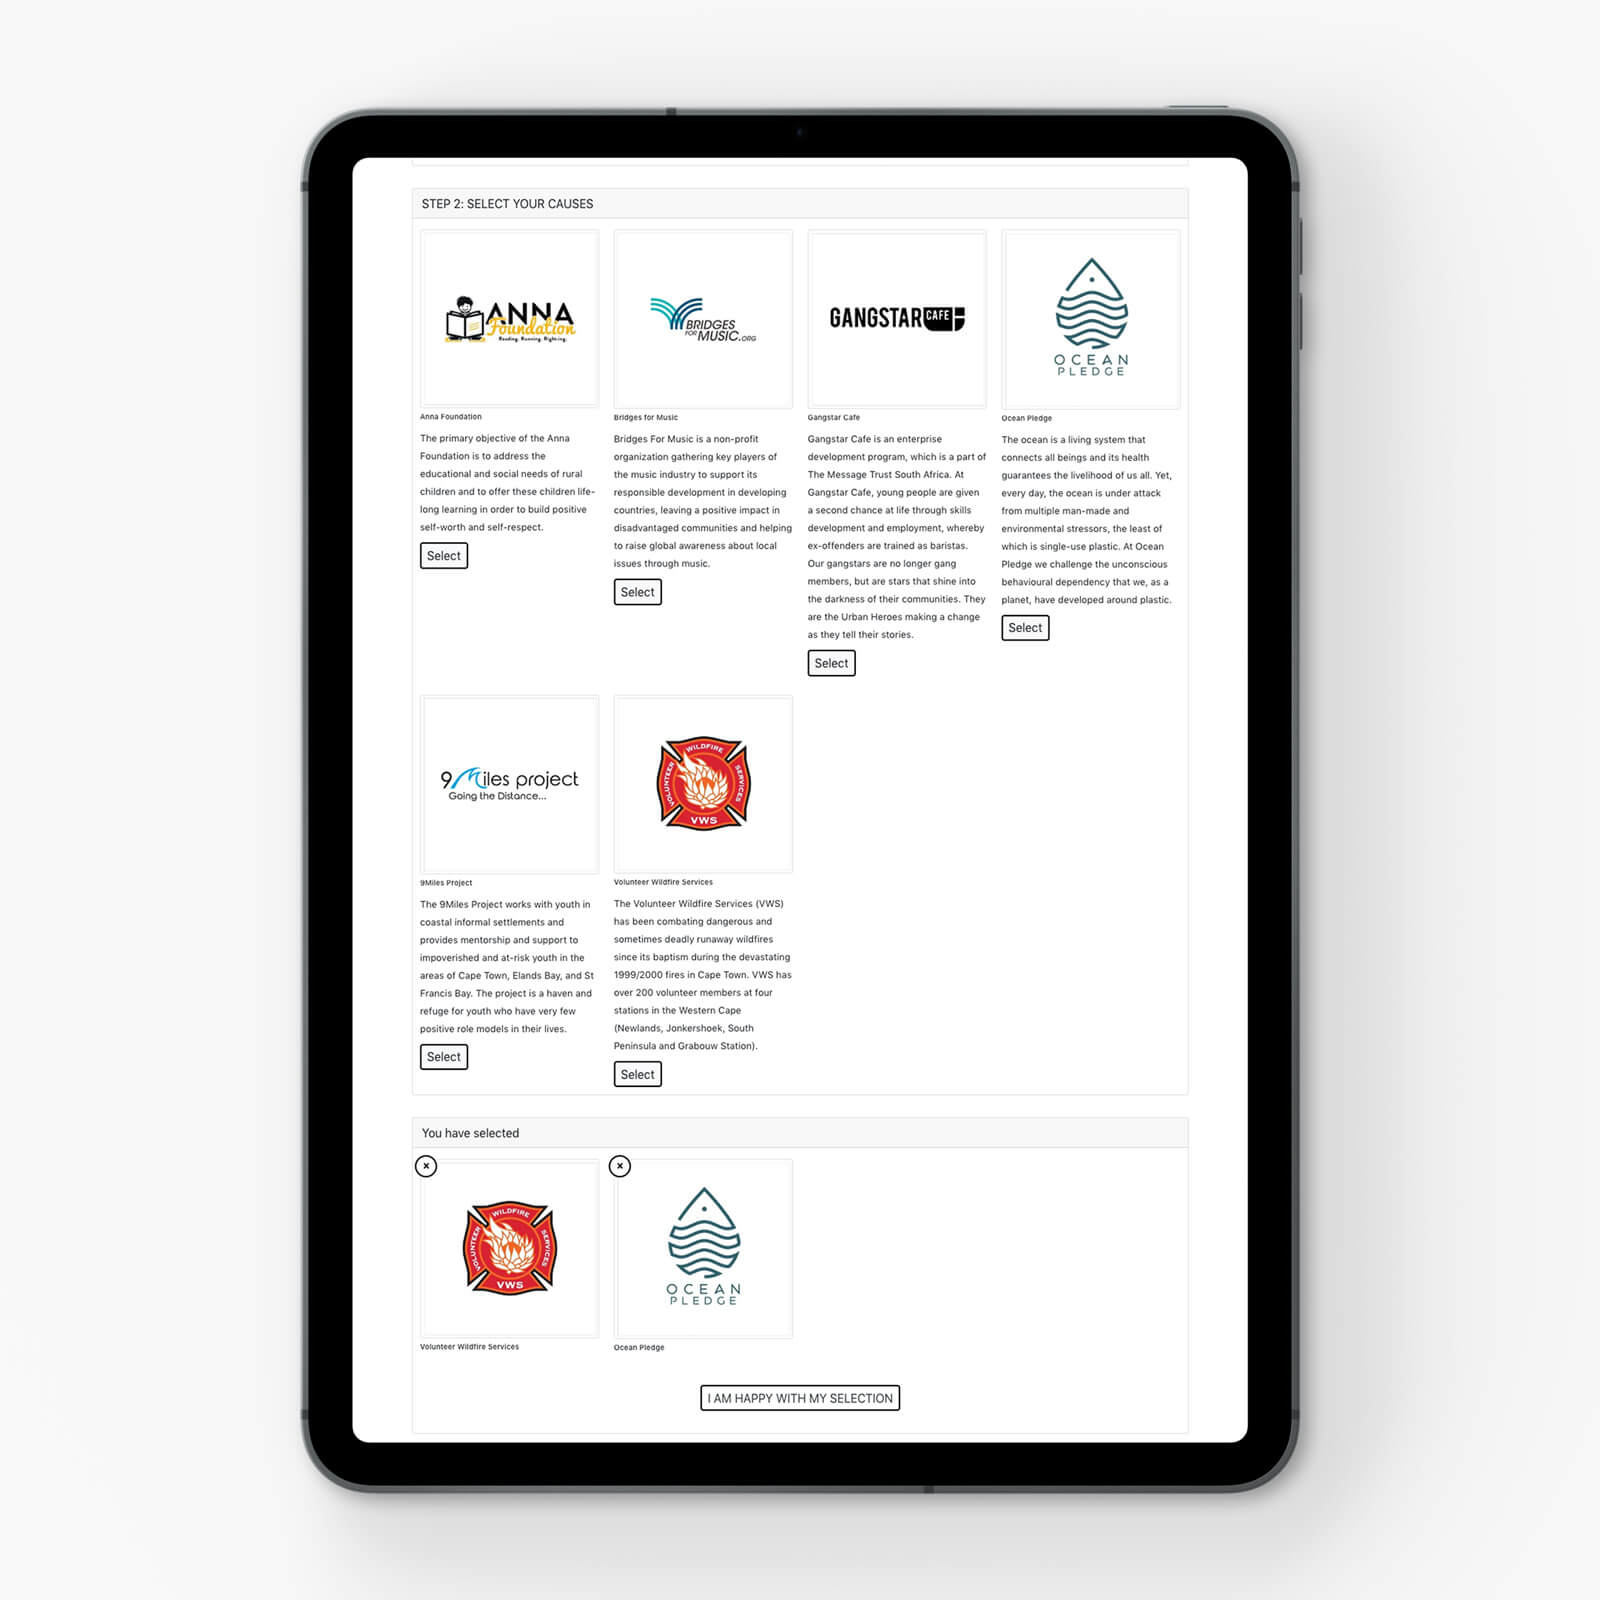
The app consists of 2x screens, one for the login and selecting of the causes. The second screen is to creating the email template with your own message with an selection option to be able to select which persons you want to send the email to. The second screen also gives you a preview of how the email will look with your custom message and the causes that you selected.
Back-End
Since I had a limited budget to work on, I decided to use a headless WordPress CMS approach for the backend to store the Causes, Orders, Transactions and Users. The WordPress CMS also acted as the email transaction service to send out the responsive dynamically created emails. So custom PHP & MySQL development was required and build into a 3rd Party custom WordPress build plugin.
Back-end Parts:
The back-end was responsible for .:
- Authentication. Cookie Authentication as mentioned above.
- Login State Session.
- Management of the Causes. Creating, Editing the Causes and sending the content to the front-end app. Title, image, description, cause-id and such.
- Transactions. To store a copy of each transaction, email template content and the selected causes.
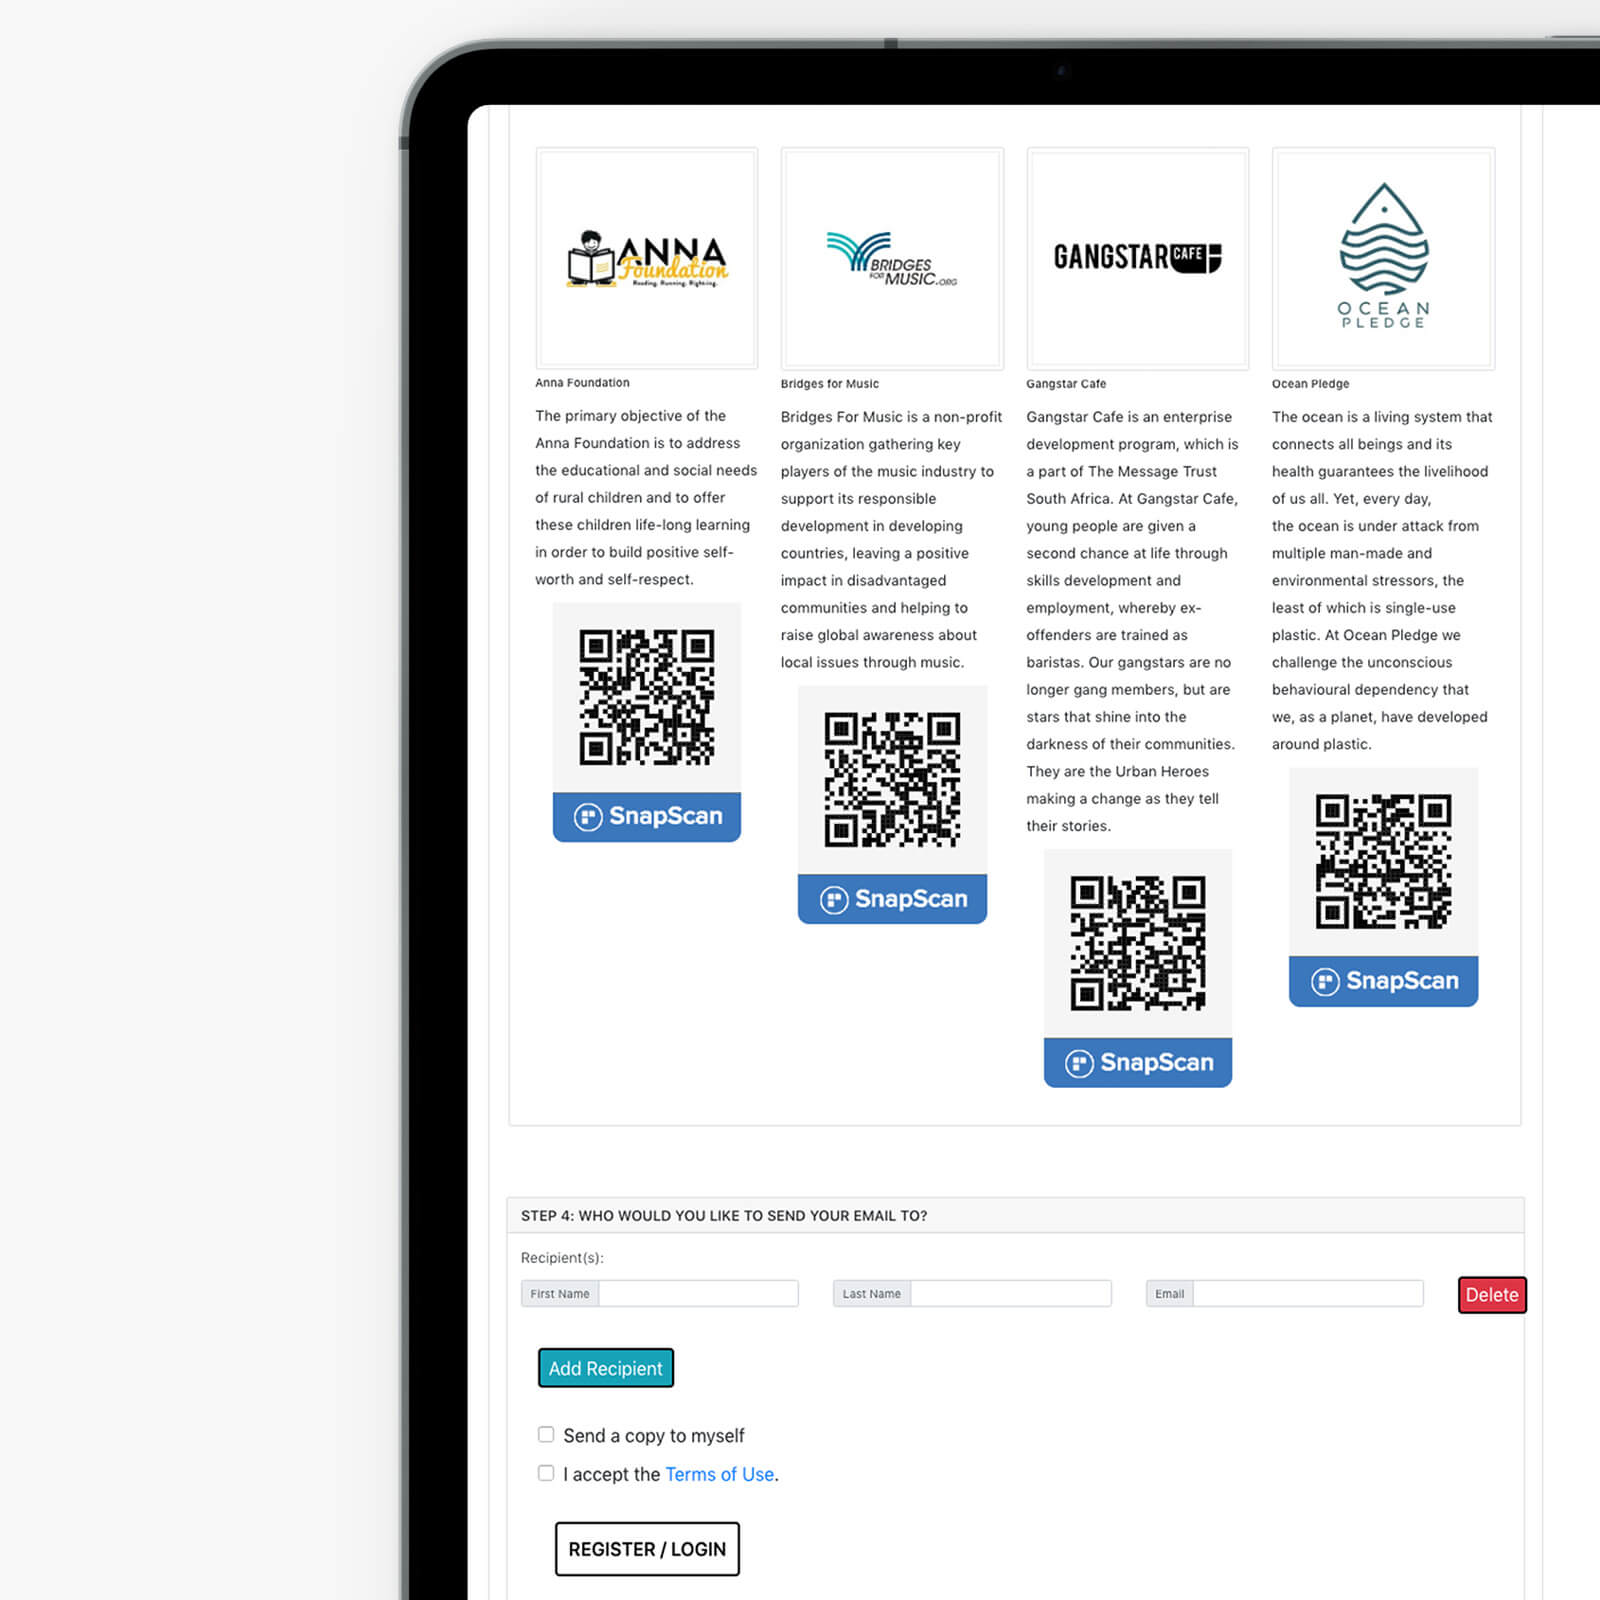
- Orders. When the SnapScan API, the payment merchant, responds with a successful or failed transaction via an API call. The whole order is saved as a custom post with custom fields containing all the transaction details, together with a transaction code for reference. You are also able to see who placed the order and what causes they selected. The reason for this is, if my client later decides he wants to reissue the emails, that might have gotten stuck or failed, he could do so with a bit of extra functionality added.
- Email Transactions. The data received from the front-end app send as a JSON object to the back-end. The custom plugin that I build for the client then receives this payload and inject the email content into the custom email template dynamically, each and every single time. The reason is that most users will only select a certain number of causes, maybe 2x or 3x or even 6x. So that the template can dynamically adjust to the content it receives. I decided to use another JavaScript framework to build out the responsive email template which is called the Foundation of Emails 2 Framework from the ZurB foundation, available as an NPM package. Which also makes use of a compiler. T- he backend code was also responsible to make an API connection to the payment merchant to generate the QR codes via the SnapScan API.
Something Extra
Nothing always goes smooth sailing, and there was a problem with the login. You see the WordPress CMS is a server-side, a server rendered CMS app. So in WordPress Authentication, the login method needs to happen server side. If you are familiar with WordPress you will know that WordPress has 2x entry points, pages where you can log in and once login the page reloads to authenticate you. That is because the data is POSTED to WordPress via PHP.
The problem with my Single Page App was that it was JavaScript that is running in the client, the browser. I was told it was not possible to authenticate with JavaScript or the Client (browser)... knowing my stubbornness sometimes, I knew there is always solution if you look hard enough or put in some effort and do a bit of research, inspect code, look at the developer docs.
So I did find a working solution to be able to log in via JavaScript, client-side. The solution was the cookies! COOKIE AUTHENTICATION! You see, with each login session, for example, WordPress, WordPress issue you with a front-end session login, so you are logged into view the front-end authenticated areas. BUT there is also another cookie required for the back-end.
Cookie: contains the user name, secret key hash & time-stamp. This needs to mach the session with authenticated system to perform authenticated tasks.
Since the site already made use of an SSL certificated (two-way traffic encryption between the browser and the server) with an additional firewall, that I setup. I created a custom, secret endpoint(API connection). The endpoint also has CORS with selected attributes enabled. I am not going to give away too much for security reasons, but the short from the long.:
- When the user submits their username and password it is sent via two-way encryption to the server via a custom endpoint.
- The server then checks if the user exists and if the password is invalid.
- If that is true, the server encrypts the password with extra data and together with a session-time-stamp and username issue 2x Cookies to the user's browser. For both frontend and backend access.
- The browser then stores these Cookies and the user is authenticated with the CMS.
There are some other security steps also involved to make the app extra safe, but as stated I am unable to share those for security reasons.
Hosting
Setup of a Virtual Private Server(VPS) for the client's front-end app & back-end CMS system. I also performed other duties like setting up the SSL certifications and domain name.
Build out a small wireframe-look website to display the app and other content.
Conclusion
I think the functionality of the APP turned out quite nicely. It is 100% working and stable and the client already started generating revenue from his new venture. Yes since its an MVP, there is a lot of room for further improvements and adjustments, but its enough to get the client's startup going for the set budget that was available at the time. I loved every single moment of the project and would like to thank my Client for giving me the opportunity to build out such a solution for him.